
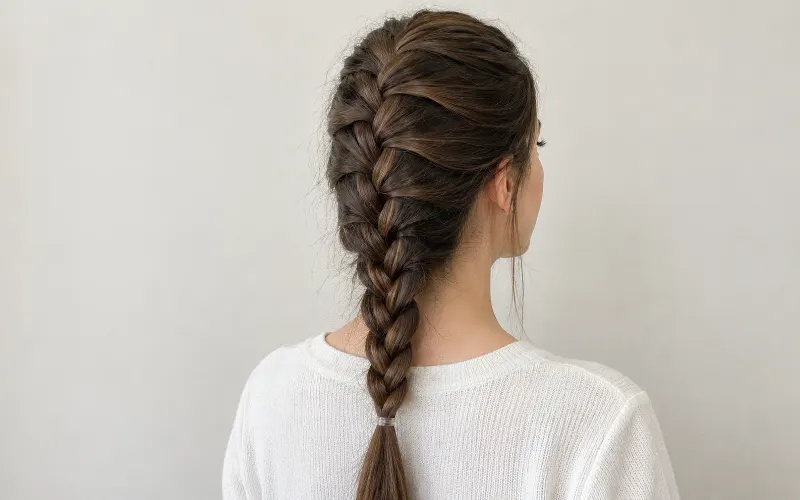
To French braid your own hair, you gather small sections from each side as you go and cross them into a three-strand braid held close to your scalp. The motion is the same one you would use on someone else.
What changes is that you cannot see it. Your hands have to report where the braid is. Your arms stay up throughout. A mirror shows everything reversed. That is the part no step list covers, and where most attempts fall apart.
How to French Braid Your Own Hair, Step by Step
French braiding your own hair runs through nine steps. Read them once before you start.
- Brush until no tangles are left. A snag mid-braid costs you your grip and your place.
- Gather a triangle at your crown, roughly between your temples. Front edge at the hairline, point toward the back.
- Split the triangle into three equal strands. Left, middle, right.
- Cross the right strand over the middle. Then the left over the middle. That is one plain stitch, and it anchors everything after it.
- Pick up a new section from the right side of your head, about a finger’s width. Add it to the right strand. Cross the whole thing over the middle.
- Repeat on the left. New pickup, add it in, cross over the middle.
- Keep alternating. Hands close to the scalp throughout. The gap between your hands and your head is exactly what the braid loses in tension.
- At the nape, when no loose hair is left to pick up, carry on as a plain three-strand braid to the ends.
- Tie off with a small elastic. For a wider braid, pull gently outward on the edge loops, working bottom to top.
Why French Braiding Your Own Hair Is Harder Than on Someone Else
French braiding your own hair is harder for three reasons. None of them is the braid.
You are working blind. On someone else your eyes correct your hands as you go. On yourself your fingers track three strands by feel alone. No instruction replaces that.
Your arms sit above shoulder height for several minutes. They tire. Grip loosens as they do. Which is why a self-done braid is usually neat at the crown and loose at the neck.
Then the mirror. Reach right and the reflection reaches left. Two mirrors reverse it back but add a delay. Most people do better looking away.
Where to Start If You Have Never French Braided Your Own Hair
Your first French braid should not be at the back of your head. Start at the side.
Part deep on one side. Pull the longer section forward over your shoulder. Braid down from the temple where you can watch your hands. Same pickups, same crossings, eyes still in the loop. It is a finished style too, so nothing is wasted.
Once the side braid feels automatic, move the motion to the back. Then stop using the mirror. The goal is hands that know where the strands are without checking. Checking is what slows that down.
Texture decides how forgiving any of this is. Fine and slippery behaves nothing like dense and coiled. The hair type quiz sorts that out, and the curl types chart is the quicker version if you only need the pattern. Porosity decides whether grip products do anything for you.
Should You French Braid Your Own Hair Wet or Dry?
Damp is the best state for French braiding your own hair. Not wet. Not freshly dried.
Damp hair holds together. Sections stay put. Flyaways lie flat. The braid keeps its shape as it dries. Soaking wet is another matter. Hair swells with water and turns more fragile. Tension that would be fine dry can stretch or snap strands.
Dry hair is easier to pick up in clean sections. That helps while you are learning. The problem is freshly washed hair. Slippery, and it fights every grip. Second-day hair braids better than clean hair. Just washed? A texture spray or a little dry shampoo at the roots gives your fingers something to hold. A natural shampoo resets things when product builds too far the other way.
How to Keep a Self-Done French Braid Straight and Even
A self-done French braid goes crooked for one reason. Uneven pickups.
Part the center with the tail of a comb before you start, not with your fingers. Then rest your little fingers either side of that part line as you work down. They tell you whether you are still centered. No mirror needed.
Take the same width every time. Alternate strictly. Two pickups on the right to one on the left pulls the braid sideways. You will not feel it happen. Bumps come from pickups that are too big, or from slack tension between passes. Smooth each new section into its strand before crossing it. The flyaways mostly go.
How to Do Two French Braids on Your Own Hair
Two French braids on your own hair need a clean part and an order of operations.
Part down the center with a comb, hairline to nape. Clip one side out of the way completely. Loose strays from the far side are what blur a part.
Braid your weaker side first, while your arms are fresh. Most people have one side that comes out worse. Doing it last guarantees it. Count your pickups if you want them to match, or at least hold the widths even on both sides.
French Braid vs Dutch Braid on Your Own Hair
A French braid and a Dutch braid use the same pickups and differ in one move. On your own hair, that difference counts.
French: cross the outer strands over the middle. The braid sinks in and lies flat. Dutch: cross them under. The braid sits raised on top. Same sections, opposite direction.
Most people find the Dutch easier on themselves. A raised braid is simpler to feel. The strands stay on top of your hands instead of vanishing beneath them. So if a French braid on yourself is not working, try the Dutch before giving up.
How to French Braid Short, Layered, Thick or Curly Hair
French braiding your own hair changes with length and texture. The fixes are small.
Short or layered hair sheds pieces as you go. Start the triangle further forward. Take narrower pickups. Accept that a few layers will escape. A small clear elastic higher up beats reaching the nape with too little length.
Thick hair is a volume problem. Smaller pickups keep each strand a size your hand can close around. Dense coily hair braids best damp with a leave-in. The pattern hides unevenness, which makes it forgiving. Curly type 3 hair sits in between. Enough texture to grip, loose enough that the pattern still shows through the braid. Fine type 1 hair is the opposite. Every slip shows. Grip product does more there than technique.
Tools That Help You French Braid Your Own Hair
No tool French braids your own hair for you. That is the honest answer to a question that usually gets upsold.
The braiding gadgets sold for this are mostly topsy-tail loops. They flip a ponytail through itself. Different stitch, and it will not build a French braid. Nothing on the market performs the gather-and-cross motion.
What helps is unglamorous. A tail comb for the part. Small clear elastics. A clip to hold the finished length while you tie off. And a phone propped up recording video. Better than two mirrors: you watch the playback and see exactly where the braid drifted.
How Tight Should a French Braid Be?
A French braid on your own hair should never hurt. Pain is the line.
The American Academy of Dermatology is direct about it: if a hairstyle feels painful, it is too tight. The signs worth knowing are broken hairs around the forehead, a receding hairline, and patches of loss where hair pulls hardest. Stinging, crusting, or tenting of the scalp means take it out now.
This matters most at the hairline. The one part of a self-done braid you can see, so the part people pull tightest. The AAD also puts a limit on it. Six to eight weeks, no longer. Thicker braids over fine ones. And a check for early signs every month. A braid you wear for a day is low risk. A braiding habit is not.
Frequently Asked Questions
Is it harder to French braid your own hair?
Yes, noticeably. The hand motion is identical, but you lose visual feedback and your arms fatigue holding position. People who braid other heads well still need practice on their own. What transfers is the crossing pattern. What you have to build is tracking three strands by feel.
Why can’t I do a French braid on myself?
Usually tension, not technique. Hands drift away from the scalp as arms tire, and the braid loosens from that gap. Uneven pickups pull it off center at the same time. Try the side braid first, where you can watch your hands, then move to the back once the motion is automatic.
How long does it take to learn to French braid your own hair?
The crossing pattern usually clicks in one sitting. Even tension across the whole braid takes several sessions, because it is muscle memory rather than instruction. A few minutes daily beats one long attempt. Expect the back of your head to lag behind the sides for a while.
Is there a tool to help you French braid your own hair?
Not for the braiding itself. Devices marketed for braiding are generally topsy-tail loops. They pull a ponytail through a gap. Different stitch. A tail comb, small elastics and a phone recording video are more useful. The video is the closest thing to seeing the back of your own head.
How do you stop your arms getting tired while braiding your own hair?
Drop your elbows between passes instead of holding them up throughout. Pin the strands with a clip for a real break. Letting go loses your place entirely. Braiding at the side over one shoulder keeps your arms much lower. Part of why it suits beginners.
Is it better to French braid wet or dry hair for beginners?
Damp, for most beginners. Sections stay put and flyaways stay down, which removes two problems at once. Avoid soaking wet, because hair swells and weakens with water. Braiding dry? Add a texture spray or dry shampoo first. Clean hair is too slippery to grip reliably.

BeautyLiesTruth publishes hair and personal color guidance built on primary research. Color claims are tested by draping under controlled daylight, and every figure is traced to a published source rather than to another blog.